필자는 openshift 구축을 위한 가이드 작성을 목적으로 글을 작성한다.
먼저 Openshift에 대해 간단히 설명하자면 kubernetes에 Enterprise 버전이라고 생각하면 좋을 것 같다.
kubernetes보다는 내장된 기능이 많고 기본적으로 console까지 제공하기에 유저 접근성이 용이하다 말할 수 있다.
[설치 전에..]
openshift는 kubernetes와 다르게 기본적으로 요구하는 사항이 높다.
※필수 사양
- vCpu : 8코어 이상, Memory: 16G 이상, DISK: 120G이상
- Bastion 1대, Bootstrap 1대, Master 3대, Worker 2대
[사전 구성]
| 구분 | hostname | IP | os | gateway | dns | 사양 | / 디렉토리 최소 요구 용량 |
|---|---|---|---|---|---|---|---|
| Bastion | bastion.ocp.dhwon.com | 192.168.50.100 | RHEL8 | 192.168.0.1 | 192.168.50.100 | 8c/ 16G | 120G |
| Bootstrap | bootstrap.ocp.dhwon.com | 192.168.50.101 | RHCOS 4.10.x | 192.168.0.1 | 192.168.50.100 | 8c/ 16G | 120G |
| Master | master-1.ocp.dhwon.com | 192.168.50.102 | RHCOS 4.10.x | 192.168.0.1 | 192.168.50.100 | 8c/ 16G | 120G |
| Master | master-2.ocp.dhwon.com | 192.168.50.103 | RHCOS 4.10.x | 192.168.0.1 | 192.168.50.100 | 8c/ 16G | 120G |
| Master | master-3.ocp.dhwon.com | 192.168.50.104 | RHCOS 4.10.x | 192.168.0.1 | 192.168.50.100 | 8c/ 16G | 120G |
| Worker | worker-1.ocp.dhwon.com | 192.168.50.105 | RHCOS 4.10.x | 192.168.0.1 | 192.168.50.100 | 8c/ 16G | 120G |
| Worker | worker-2.ocp.dhwon.com | 192.168.50.106 | RHCOS 4.10.x | 192.168.0.1 | 192.168.50.100 | 8c/ 16G | 120G |
[Bastion 구성]
- 먼저 local repo를 구성한다(기본적인 패키지 설치 이므로 외부 repositry와 연결이 가능하다면 설정할 필요가 없다)
mount -r -t iso9660 /dev/cdrom /cdrom <br><br>cat << EOF > /etc/yum.repos.d/local.repo<br>[local_BaseOS]<br>name=local_BaseOS<br>baseurl=file:///cdrom/BaseOS/<br>enabled=1<br>gpgcheck=0<br>#gpgkey=file:///etc/pki/rpm-gpg/RPM-GPG-KEY-redhat-release<br><br>[local_AppStream]<br>name=local_AppStream<br>baseurl=file:///cdrom/AppStream<br>enabled=1<br>gpgcheck=0<br>#gpgkey=file:///etc/pki/rpm-gpg/RPM-GPG-KEY-redhat-release<br>EOF
2. SElinux 및 방화벽 종료
[root@bastion ~]# systemctl disable --now firewalld
[root@bastion ~]# setenforce 0
[root@bastion ~]# vi /etc/sysconfig/selinux
```
 7 SELINUX=disabled
```
:wq
3. 패키지 설치
- L4, DNS, nfs 구성을 위한 설치
- 기본 설정을 위한 패키지 설치
[root@bastion ~]# yum update -y<br>[root@bastion ~]# yum install -y unzip bash-completion httpd bind bind-utils haproxy nfs-utils jq podman<br>[root@bastion ~]# mkdir -pv /opt/registry/{auth,certs,data}
4. HTTP 구축
- 차후 ignition 파일을 다운 받을 파일이다.
[root@bastion ~]# vim /etc/httpd/conf/httpd.conf<br>~<br> 45 Listen 8080<br>~<br>:wq<br>[root@bastion ~]# mkdir -pv /var/www/html/ocp<br>[root@bastion ~]# chmod -R 755 /var/www/html/ocp/<br>[root@bastion ~]# systemctl enable --now httpd
5. NFS 구축
- 차후 imageregistry를 설정을 위한 PV 볼륨을 위해 NFS 구성을 진행한다
[root@bastion ~]# systemctl enable --now nfs-server
<br>[root@bastion ~]# mkdir -pv /var/nfsshare
<br>[root@bastion ~]# chown -R nobody:nobody /var/nfsshare/  #RHEL7 경우 nfsnobody:nfsnobody
<br>[root@bastion ~]# echo '/var/nfsshare 192.168.0.0/16(rw,sync,root_squash)' >> /etc/exports
<br>[root@bastion ~]# exportfs -r
<br>[root@bastion ~]# systemctl restart nfs-server
6. DNS 구축
- openshift는 도메인 기반으로 통신하기 때문에 DNS가 필수적으로 구축이 필요하다
[root@bastion ~]# vim /etc/named.conf

~

 11         listen-on port 53 { any; };

 19         allow-query     { any; };

~

:wq
- ZONES 추가
[root@bastion ~]# cat << EOF >> /etc/named.rfc1912.zones

zone "ocp.dhwon.com" IN {

    type master;

    file "ocp.dhwon.com.zone";

    allow-update { none; };

};


zone "50.168.192.in-addr.arpa" IN {

    type master;

    file "ocp.dhwon.com.rev";

    allow-update { none; };

};

EOF

# 역방향 적을 시 자신이 사용하는 네트워크 대역 입력 필수

※ 네트워크 대역은 반드시 역방향으로 적을 것
- zone 생성
[root@bastion ~]# cat << 'EOF' > /var/named/ocp.dhwon.com.zone

$TTL 1D

@       IN SOA  @ bastion.ocp.dhwon.com. (

                                        0       ; serial

                                        1D      ; refresh

                                        1H      ; retry

                                        1W      ; expire

                                        3H )    ; minimum


; name servers - NS records

        NS     bastion.ocp.dhwon.com.


; OpenShift Container Platform Cluster - A records

bastion         IN      A       192.168.50.100

bootstrap       IN      A       192.168.50.101

master-1        IN      A       192.168.50.102

master-2        IN      A       192.168.50.103

master-3        IN      A       192.168.50.104

worker-1        IN      A       192.168.50.105

worker-2        IN      A       192.168.50.106


; OpenShift internal cluster IPs - A records

api             IN      A    192.168.50.100

api-int         IN      A    192.168.50.100

*.apps          IN      A    192.168.50.100

EOF
- rev 생성
[root@bastion ~]# cat << 'EOF' > /var/named/ocp.dhwon.com.rev

$TTL 1D

@       IN SOA  @ bastion.ocp.dhwon.com. (

                                        0       ; serial

                                        1D      ; refresh

                                        1H      ; retry

                                        1W      ; expire

                                        3H )    ; minimum

; name servers - NS records

        NS     bastion.ocp.dhwon.com.


; OpenShift Container Platform Cluster - PTR records

101     IN      PTR   bootstrap.ocp.dhwon.com.

102     IN      PTR   master-1.ocp.dhwon.com.

103     IN      PTR   master-2.ocp.dhwon.com.

104     IN      PTR   master-3.ocp.dhwon.com.

105     IN      PTR   worker-1.ocp.dhwon.com.

106     IN      PTR   worker-2.ocp.dhwon.com.

100     IN      PTR   api.ocp.dhwon.com.

100     IN      PTR   api-int.ocp.dhwon.com.

EOF
- zone 체크
[root@bastion ~]# chmod 644 /var/named/ocp.dhwon.com.*

[root@bastion ~]# chmod 644 /var/named/ocp.dhwon.com.*

[root@bastion ~]# named-checkconf /etc/named.conf

[root@bastion ~]# named-checkconf /etc/named.rfc1912.zones

[root@bastion ~]# named-checkzone ocp.dhwon.com /var/named/ocp.dhwon.com.zone

zone ocp.dhwon.com/IN: loaded serial 0

OK

[root@bastion ~]# systemctl enable --now named

[root@bastion ~]# nmcli # dns server에 현재 작업중인 서버의 ip 추가(bastion)
7. HAproxy(Software L4) 구축
- 클러스터링 이후 하나의 IP로 통신이 필요 하므로 bastion의 ip가 L4에 대표IP가 된다.
[root@bastion ~]# mv /etc/haproxy/haproxy.cfg /etc/haproxy/haproxy.cfg_bak #원복 백업

[root@bastion ~]# cat << "EOF" > /etc/haproxy/haproxy.cfg

# Global settings

#---------------------------------------------------------------------

global

    maxconn     20000

    log         /dev/log local0 info

    chroot      /var/lib/haproxy

    pidfile     /var/run/haproxy.pid

    user        haproxy

    group       haproxy

    daemon


    # turn on stats unix socket

    stats socket /var/lib/haproxy/stats


#---------------------------------------------------------------------

# common defaults that all the 'listen' and 'backend' sections will

# use if not designated in their block

#---------------------------------------------------------------------

defaults

    mode                    http

    log                     global

    option                  httplog

    option                  dontlognull

    option http-server-close

    option forwardfor       except 127.0.0.0/8

    option                  redispatch

    retries                 3

    timeout http-request    10s

    timeout queue           1m

    timeout connect         10s

    timeout client          300s

    timeout server          300s

    timeout http-keep-alive 10s

    timeout check           10s

    maxconn                 20000


frontend openshift-api-server

    bind *:6443

    default_backend openshift-api-server

    mode tcp

    option tcplog


backend openshift-api-server

    balance source

    mode tcp

    server bootstrap 192.168.50.101:6443 check fall 3 rise 2

    server master-1 192.168.50.102:6443 check fall 3 rise 2

    server master-2 192.168.50.103:6443 check fall 3 rise 2

    server master-3 192.168.50.104:6443 check fall 3 rise 2


frontend machine-config-server

    bind *:22623

    default_backend machine-config-server

    mode tcp

    option tcplog


backend machine-config-server

    balance source

    mode tcp

    server bootstrap 192.168.50.101:22623 check fall 3 rise 2

    server master-1 192.168.50.102:22623 check fall 3 rise 2

    server master-2 192.168.50.103:22623 check fall 3 rise 2

    server master-3 192.168.50.104:22623 check fall 3 rise 2


frontend ingress-http

    bind *:80

    default_backend ingress-http

    mode tcp

    option tcplog


backend ingress-http

    balance source

    mode tcp

    server worker-1 192.168.50.105:80 check fall 3 rise 2

    server worker-2 192.168.50.106:80 check fall 3 rise 2


frontend ingress-https

    bind *:443

    default_backend ingress-https

    mode tcp

    option tcplog


backend ingress-https

    balance source

    mode tcp

    server worker-1 192.168.50.105:443 check fall 3 rise 2

    server worker-2 192.168.50.106:443 check fall 3 rise 2

EOF
[openshift 기본 명령어 다운로드]
참조: https://access.redhat.com/downloads/content/290/ver=4.10/rhel—8/4.10.9/x86_64/product-software
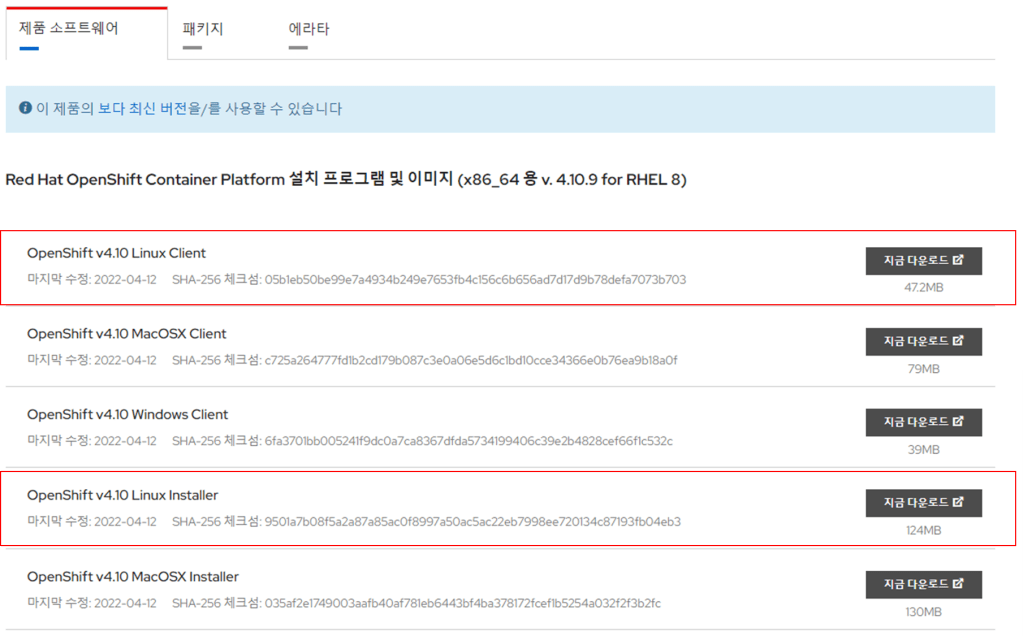
- ocp 관련 명령어 설치 및 확인
[root@bastion ~]# chmod -R 755 /var/www/html/ocp/

[root@bastion ~]# tar zxvf openshift-install-linux-4.10.9.tar

[root@bastion ~]# tar zxvf oc-4.10.9-linux.tar.gz

[root@bastion ~]# mv oc kubectl openshift-install /usr/local/bin/

[root@bastion ~]# openshift-install version

openshift-install 4.10.9

built from commit cf244530e9699eb209036670a17ab471f98f9f9b

release image quay.io/openshift-release-dev/ocp-release@sha256:39f360002b9b5c730d1167879ad6437352d51e72acc9fe80add3ec2a0d20400d

release architecture amd64

[root@bastion ~]# oc version

Client Version: 4.10.9
- Pull Secret 파일생성
참조:https://cloud.redhat.com/openshift/install/metal/user-provisioned 에서 Pull secret을 복사합니다.
[Igniniton FIle 생성 및 install-config.yaml 작성]
- ssh키 생성
[root@bastion ~]# ssh-keygen -t rsa -b 4096 -N ''
[root@bastion ~]# eval "$(ssh-agent -s)"

Agent pid 3634

[root@bastion ~]# ssh-add /root/.ssh/id_rsa

Identity advi /ded: /root/.ssh/id_rsa (root@bastion.ocp.dhwon.com)
- install-config.yaml 작성
[root@bastion ~]# mkdir /root/ocp

[root@bastion ~]# vim /root/ocp/install-config.yaml

apiVersion: v1

baseDomain: dhwon.com

metadata:

  name: ocp


compute:

- hyperthreading: Enabled

  name: worker

  replicas: 0


controlPlane:

  hyperthreading: Enabled

  name: master

  replicas: 3


networking:

  clusterNetwork:

  - cidr: 10.128.0.0/14

    hostPrefix: 23

  networkType: OpenShiftSDN

  serviceNetwork:

  - 172.30.0.0/16


platform:

  none: {}


fips: false


# 아까 복사한 pull-secret.json에 있는 정보 입력

# 확인하고 넣을 것

pullSecret: '{"auths":{"bastion.ocp.dhwon.com:5000":{"auth":"YWRtaW46b3Blbm5hcnU=" }


# ssh키 넣기. /root/.ssh/id_rsa.pub

sshKey: 'ssh-rsa AAAAB3NzaC1yc2EAAAADAQABAAACAQDDnAeGbOeUVhswgMLTw4FxuKczAAwL1l3kBtQ93+AcEhr5UNGosaLS7kTxyjrcCuJO4EImgP1+OxNGM+xyN0Vw/uM5Lm/W6fsgVXrfJ733RCr1xJuAesyQOKZsNBvBdSRhF+GCjNWsSArdk53t9DmCgbeWqDPFgmLo4Fg0Zw7Q2gZevHyjXwIMmyz95ltqqw8DCxb6QVbiZEKnHcnd20/wePA/fV6ZGkZDgsQb8tXhI8LHgWpyiA0P2lflxvF4j+Psei/wL0PQXDKgrdR8SsNVu4jJTJPxP+jtm9m8++Vo7w/Wg8BABkFQ0tlctZgN782dpGRQ6cGHuudv8TroiP8/DM2U56AkEkgoS5ZFr/ILVKU+d8LKRJ46+IcWbC2lGPazo2oq1QTqxaBxkrVA8qHnxrmtufbdKdmP2mUFTl4hdnP7juCp4hLzEkQM4SUrJo1DP4JHONlewmw5aSwsxvXBFqqH0oJdtI3gk1S3Q3Vaa8CEzRSv18EOGK19rANSE/nsbs7kuBGdRJq/nzW7dj3y7I+Y9NuHrTBJhYxqEPEKGcHv9z95H9Cb0RQzh3PODJ8joiW/FbvD/NXLWX+wqB8W+kZTHICrCPEQEayi5trRegtRjhqkdmiBaTpSISVWuN2f0FA8TXEpEcvqWu7k/mfOX3XaVMyv0iCJsYfJwvzgAQ== root@bastion.ocp.dhwon.com'
- ignition file 생성
[root@bastion ocp]# mkdir install_dir && cd $_

[root@bastion install_dir]# cp ../install-config.yaml .    # ingnition file 생성시 기존의 install-config.yaml이 삭제 되므로 에러추적을 위해 복사

[root@bastion install_dir]# openshift-install create manifests --dir=/root/ocp/install_dir


# master 노드에서 worker 역할을 하지 않도록 하려면 mastersSchedulable을 false로 변경한다.

[root@bastion install_dir]# vim manifests/cluster-scheduler-02-config.yml

~

  7   mastersSchedulable: false

~

:wq
- igniton 파일 /var/www/html 경로로 이동
[root@bastion install_dir]# mkdir /var/www/html/ocp

[root@bastion install_dir]# openshift-install create ignition-configs --dir=/root/ocp/install_dir

[root@bastion install_dir]# cp -vrp /root/ocp/install_dir/*.ign /var/www/html/ocp/.

[root@bastion install_dir]# cp -vrp /root/ocp/install_dir/metadata.json /var/www/html/ocp/.

[root@bastion install_dir]# chmod -R 755 /var/www/html/

[root@bastion install_dir]# curl localhost:8080/ocp/metadata.json

{"clusterName":"ocp","clusterID":"f504b3e1-ef4f-4fc3-879d-78afd3b80304","infraID":"ocp-xxjsr"} #메타데이터 리턴 값 확인
[Node구축]
- Bootstrap 구축
- coreOS LIve 부팅 후에 IP 설정 후
[core@bootstrap ~]$ sudo coreos-installer install --copy-network --ignition-url=http://bastion.ocp.dhwon.com:8080/ocp/bootstrap.ign /dev/sda --insecure-ignition

Installing Red Hat Enterprise Linux CoreOS 410.84.202201251210-0 (Ootpa) x86_64 (512-byte sectors)

> Read disk 3.8 GiB/3.8 GiB (100%)

Writing Ignition config

Copying networking configuration from /etc/NetworkManager/system-connections/

Copying /etc/NetworkManager/system-connections/ens100.nmconnection to installed system

Install complete.

[core@bootstrap ~]$ sudo reboot
- Bootstrap 로그 확인 및 확인
[root@bastion ~]# ssh core@192.168.1.86  # bastion에서 ssh 접속

[core@bootstrap ~]$ journalctl -b -f -u release-image.service -u bootkube.service

# 부트스트랩 노드 확인

[root@bastion ~]# openshift-install wait-for bootstrap-complete --dir=/root/ocp
2. Master 구축
- bootstrap이 반드시 완료된 이후에 이 과정을 진행 해줘야 한다.
- Master Node 구축
- oc 명령어 사용을 위한 설정
[root@bastion ~]# mkdir ~/.kube

[root@bastion ~]# cp /root/ocp/install_dir/auth/kubeconfig ~/.kube/config

[root@bastion ~]# oc completion bash > oc_bash_completion

[root@bastion ~]# cp oc_bash_completion /etc/bash_completion.d/

[root@bastion ~]# source /etc/bash_completion.d/oc_bash_completion

[root@bastion ~]# oc get nodes

3. worker 구축
- master 구축이 어느 정도 끝나고 worker node도 동일한 방법으로 설치 진행 (※ worker.ign)
- 인증서 추가가 되지않으면 노드가 추가 되지 않으므로 아래 while문을 통해 추가 해주면 된다.
[core@worker ~]$ sudo coreos-installer install --copy-network --ignition-url=http://bastion.ocp.dhwon.com:8080/ocp/worker.ign /dev/sda --insecure-ignition

[core@worker ~]$ sudo reboot


--- # Certificate Signing Requests(CSR) 승인

[root@bastion ~]# watch -n 1 'oc get co;oc get nodes;oc get csr'

[root@bastion ~]# oc get csr | grep -v NAME | awk '{print $1}'   # 개별 승인을 하고자 하는 경우 해당 명령어로 이름 확인후 승인

[root@bastion ~]# oc adm certificate approve $(oc get csr | grep -v NAME | awk '{print $1}') # 해당 명령어로 전체 노드 승인

[root@bastion ~]# oc get nodes


※ while true; do oc adm certificate approve $(oc get csr | grep -v NAME | awk '{print $1}'); sleep 3; done

[설치 마무리]
- oc get co를 통해 cluster operator가 정상적으로 설치 되었는 지 확인

2. 정상 설치 확인 이후 haproxy에서 bootsrap 부분을 주석 처리 또는 삭제 진행 해준다
[root@bastion ~]# vim /etc/haproxy/haproxy.cfg

~

 46     #server bootstrap 100.100.110.20:6443 check fall 3 rise 2

~

 60     #server bootstrap 100.100.110.20:22623 check fall 3 rise 2

~

:wq

[root@bastion ~]# systemctl restart haproxy
